By Sarah Browning, Extension Educator, Lancaster County
Many gardeners have heard of sheet composting, but they may know it by another name — lasagna composting. This is a cold composting method, which requires no turning. It’s a great way to convert grass areas into vegetable beds, create new perennial beds or enlarge existing beds and improve the soil in an area, while utilizing organic materials from your home, kitchen or garden.
Since this is a cold composting method, it takes longer for materials to break down than a hot compost pile. Usually 6 months or more are required before the materials are fully decomposed and ready for planting, so plan ahead. Fall is a great time to create a sheet composting bed, but it can be created any time of year.
WHAT CAN I COMPOST?
Start by assembling your materials. You’ll need both high nitrogen and high carbon materials. High nitrogen materials include green leaves, green grass clippings, kitchen waste like fruit and vegetable scraps, coffee grounds, alfalfa hay, soybean or cottonseed meal, blood meal and manure (cow, horse, poultry).
High-carbon materials include dry brown leaves, pine needles, sawdust, wood chips, bark, corn cobs, corn stalks, straw, newspaper, cardboard and wood waste. Branches and twigs larger than one-quarter inch in diameter should be put through a shredder or chipper before composting. Newspaper and cardboard are great to create the first layer of your lasagna compost bed.
Do not compost meat, bones, grease, eggs and dairy products; they can attract wildlife and rodents. Do not add weeds or diseased plants to a sheet compost pile, either. Since this is a cold compost method, there is no heat to kill disease spores or weed seed.
STEPS TO CREATING A SHEET COMPOSTING BED
1. If this is a new bed, mow the grass or other vegetation as short as possible. Scalp it down to the soil if you can. However, a sheet compost pile can be created on bare soil, too, if that’s what is available.
2. Loosen the underlying soil with a spading fork, to create good water drainage.
3. While you’re loosening the soil, also remove any perennial weeds. Dig them out and discard them. The compost pile will not smother or kill them.
4. Cover the area with 4–6 overlapping layers of newspaper or cardboard. Wet the newspaper or cardboard thoroughly.
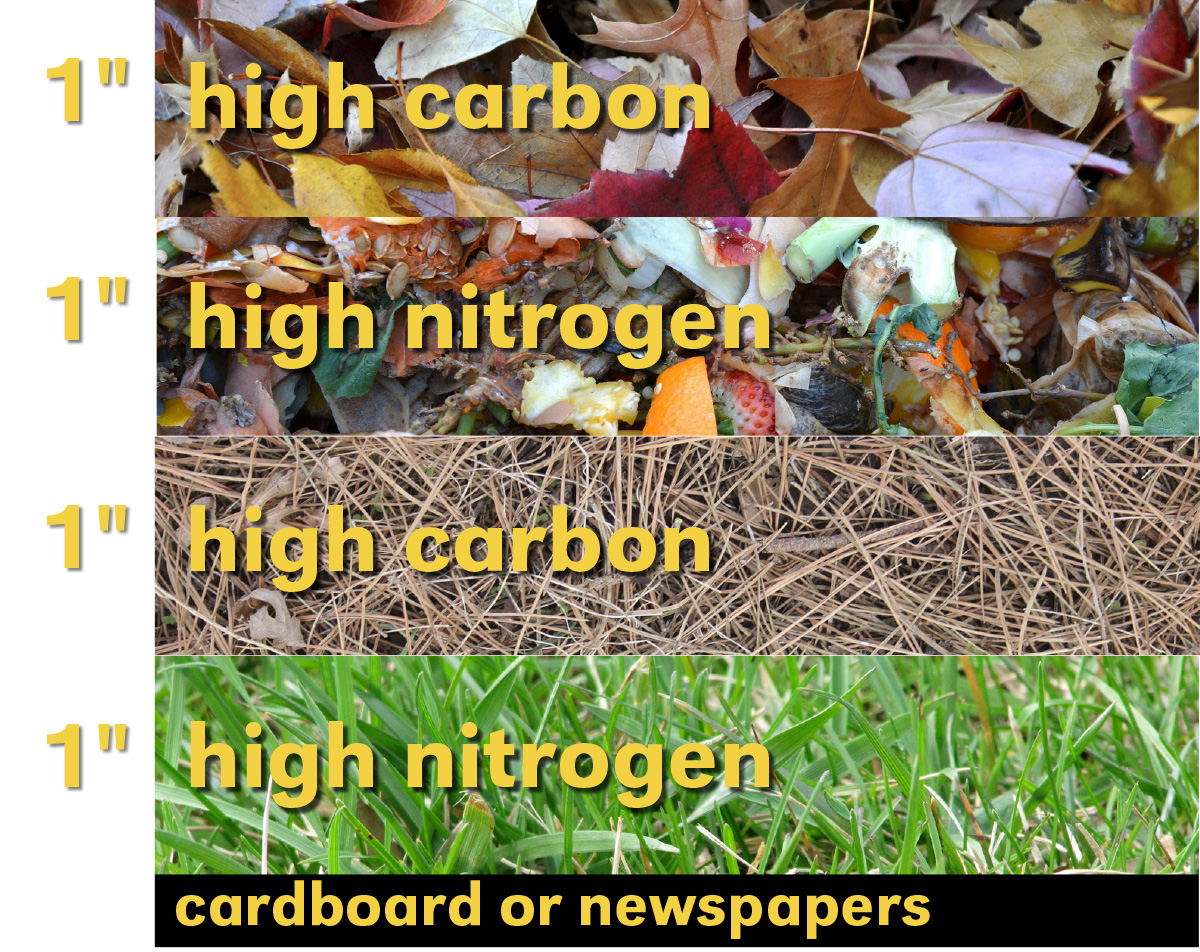
5. Cover the first layer with 1-inch of high nitrogen material like green grass clippings or manure.
6. Add a 1-inch layer of high-carbon material like dry tree leaves, straw, shredded paper or brown grass clippings.
7. Continue alternating with 1-inch layers of high-nitrogen materials, followed by high-carbon materials until the pile reaches 18–36 inches in height.
Make sure the pile stays moist, but not soaking wet. If the pile starts to smell like rotten eggs, that’s a good indication it has become too wet. Stop adding water until the smell goes away. Or if rain is the problem, cover the pile with a tarp until the rainy period ends. Black plastic sheeting works well for this purpose and also helps to add some heat to the pile. Weigh the sides down to hold it in place.
The bed is finished when all the materials have broken down to the point the original materials are no longer recognizable. It will look and smell like black dirt, and is ready for planting.
FOR MORE INFORMATION
Nebraska Extension NebGuide, Garden Compost (G2222), is available online at http://go.unl.edu/gardencompost