Use a contact group (may also been known as a distribution list) to send an email to multiple people – a project team, a committee, or even just a group of friends – without having to add each name each time you want to write them.
To create contact group:
1. On the Navigation bar, click "People."
2. Under "My Contacts," pick where you want to add the contact group. For this example, click "Contacts."
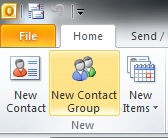
3. On the "Home" tab choose "New Contact Group."
4. On the "Contact Group" tab, in the "Name" box, type a name for the group.
5. Click "Add Members," and then add people from your address book or contacts list.
Note: To add someone who is not in your address book or contacts, create or add a person as a contact.
6. Click "Save and Close."
Information taken from Microsoft Outlook 2013 Help and can also be found on SharePoint in the Software Users Group > Shared Documents > Outlook-Office 365 > Creating a Contact Group.docx.